Thursday, December 24, 2015

Quick and Easy Cabled Gauntlet

Quick and Easy Cabled Gauntlets
DSC00034.JPG
Created by Heather Wells


Hey all, I wrote this pattern a long time ago, but I knit up a pair of gauntlets last night for a quick Christmas Present. I wanted to get it up in case any of you needed to make a last minute gift.

Materials:
220 yards Worsted Weight yarn
U.S. Size 7 and 8
Gauge: 18st/ 9rows = 2” using cabled pattern slightly stretched


*** This is basicly a cabled rib it stretches, so as long the yarn isn’t bulky, and you are using the right sized needles, you can follow the pattern without knitting a gauge.***


With U.S. 8 needles cast on 50
Rows 1,3, and 5: *K2,P2,K6, P2. Repeat from * ending with a K2.
Rows 2,4,6, and 8: *P2, K2, P6, K2. Repeat from * ending with P2.

Row 7: *K2,P2, C6F, P2.  Repeat from * ending with K2.


Continue in repeating rows 1 - 8 until piece measures 6” Change to size U.S. 7 needles continue working in pattern until piece measures 12 ½”  Bind off.  

Fold in half lengthwise and sew from the cast on edge till there is 4” remaining.  Sew from the Bind off edge for 2”.  this will leaving a 2” opening for your thumb.  Turn inside out, secure ends, and weave them in.  
Flip it right side out again, and you are finished.

P.S. You can keep track of your rows easily by writing down the amount of rows there are in a pattern, and then use hash marks to keep track of what you have done.
1. 5.
2. 6.
3. 7.
4. 8.

DSC00035 (2).JPG


Wednesday, October 28, 2015

Mid Length, and Long Knitted Triangle Shawl Pattern

Mid Length Shawl
Design Created By: Heather Wells


One Skein of Prism Cool Stuff
Colorway I used is: Tumbleweed
Use a size U.S. 10.5 - 11 needle (I used a 10.5)


Roll into a ball, reserve and set aside 7 - 8 of the yarns for fringe.


Cast on 1
Row 1: K1. (RS /1 st)
Row 2: K1 and P1 into K1 of previous row. (2 sts)
Row 3: P1 and K1 into 1st stitch, K1. (3 sts)
Row 4: K1 and P1 into first st. P across (4 sts)
Row 5: P1 and K1 into first stitch, K across (5 sts)
Row 6: K1 and P1 into first stitch, P across (6 sts)
Row 7:  P1 and K1 into first stitch, K across to last stitch, Inc in last stitch (8 sts)
Row 8: K1 and P1 into first stitch, P across (9 sts)
Row 9: P1 and K1 into first stitch, K across (10 sts)
Row 10: K1 and P1 into first stitch, P across to last stitch, Inc in last stitch (12 sts)
Repeat rows 5 - 10  For Desired Length, Bind off loosely, and add fringe.
Note, once you are on the repeating rows you increase in the beginning of two rows, the at the beginning and end of every third row.   


Long Triangle Shawl
DSC09865 (1).JPG
Design Created By: Heather Wells


Materials,
2 Skein Prism, Cool Stuff (600 yards)
**If you like long gypsy style shawls  (this falls right at my ankles when I wear it, but I am only 5 feet tall. )**
Use a circular needle U.S. 10.5
Colorway I used is: Ember
Reserve at least 10 of 11 - 12 of the yarns for fringe
Cast on 1
Row 1: K1. (RS /1 st)
Row 2: K1 and P1 into K1 of previous row.
Row 3: P1 and K1 into 1st stitch, K1.
Row 4: K1 and P1 into first st. P across
Row 5: P1 and K1 into first stitch, K across


Repeat rows 4 - 5 for desired length, Bind Off loosely, and add fringe.
** For beginners, note that each row you gain one stitch.**


DSC09866 (1).JPG
This is the difference in Length.  

Prism Colorway Tumbleweed       Prism Colorway Ember
DSC09868 (1).JPGDSC09867 (1).JPG

Sunday, October 18, 2015

National Apple Month

Happy October.
It has been crazy here, things were slowing down, but I am in the middle of root canal work.

I am currently filming the winter squash tutorial, then plan on doing some apple based tutorials, a couple more sandwiches, and I am still wanting to finish a pink mermaid.


I wanted to make an announcement about the upcoming surprise package for the patreon donors.  The next package will include a supply necessary for a tutorial I am excited about making in November.    The 15.00 donors will receive it at the beginning of November. The 9.00 subscribers will receive it their December Package since they get a package every other month.

Here is the link to my patreon page.  I got a late start on tutorials this month.  The package also includes some winter squash charms, and some from the next tutorial that will be posted  the following weekend  ;)  (October 24th - 26th)
Heather

Thursday, October 8, 2015

Crochet Cheese Burger Bean Bag / Foot Bag Pattern

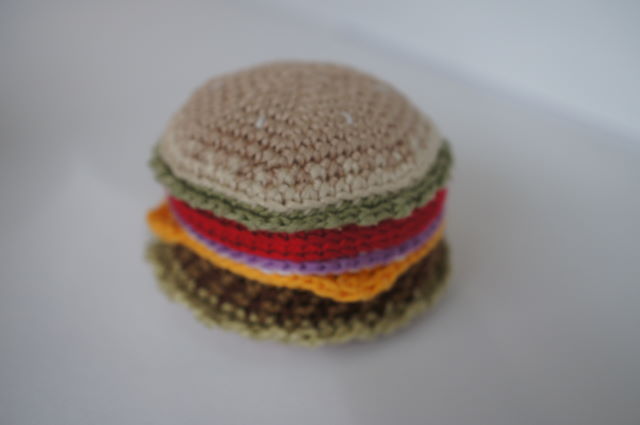
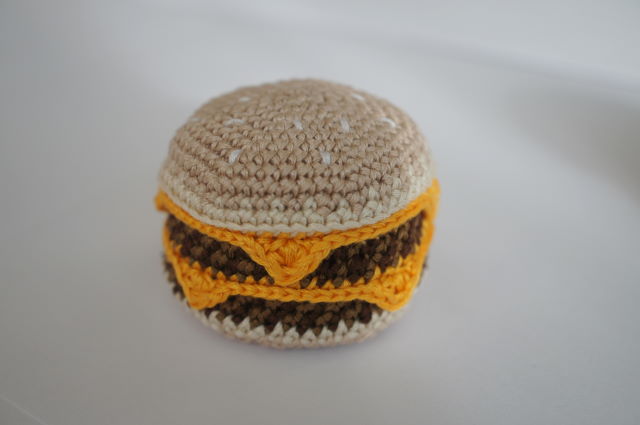
Cheeseburger Foot Bag / Bean Bag
DSC09804 (1).JPG
Design by: Heather Wells


Note: You don’t have to find the exact colors I used for your cheeseburger.  There is a huge color selection of embroidery thread.  I am only providing the colors I used, in case you want the exact colors you see in my cheeseburgers.


Materials:
U.S. 1 / 2.35 mm crochet hook
Stuffing: Poly-Fil  poly -pellets for stuffing
DMC Embroidery Thread as Follows


Buns: 3 -842, and 1 ecru (optional- ecru is the lighter color at the edges)
Sesame seeds: 1 Blanc
Lettuce: 1 -3364
Tomato: 1 -321
Red Onion: 1 Blanc, 1 -209
Cheese: 1 -742
Meat: 1 -938, 1 -610 (optional- the second color is a lighter brown to give an almost grill like effect to the meat)


Helpful Hint.  you can put the toppings in any order you wish, leave toppings out etc.  Think of this project as three sections, the increase portion, the middle (11 rows), and the decrease portion.  


The increase section + 1 - 2 rnds is your top bun
8-9 rnds of toppings
1 row + decrease rnds bottom bun


You can add or take away a rnd in the middle without affecting the shape too much if you need to. Here is how much height the toppings take up


lettuce 1 rnd, tomato 2 rnds, red onion 1 rnd, cheese 1 rnd, meat 3 rnds


Add your topping rows together before making your burger if you wish to change the toppings, here are two examples
Cheeseburger Double Cheeseburger
Top Bun 1 rnd Top Bun 2 rnds
Lettuce 1 rnd Cheese 1 rnd
Tomato 2 rnds Meat 3 rnds
Red onion 1 rnd Cheese 1 rnd
Cheese 1 rnd Meat 3 rnds
Meat 3 rnds Bottom Bun 1 rnd  = 11 rnds
Lettuce 1 rnd
Bottom Bun 1 rnd= 11 rows


Top Bun
Round 1: With color 842 ch 2, 6 sc in 2nd ch from hook.  Join with a slip st to 1st sc. (6 sc)


Round 2: Ch 1, 2sc in each sc around.  Join with a slip st to 1st sc. (12 sc)


Round 3:  Ch 1, *sc in next sc, 2sc in next sc. Repeat from * 5 times. Join with a slip st to 1st sc. (18 sc)


Round 4: Ch 1, *sc in next 2 sc, 2sc in next sc.  Repeat from * 5 times. Join with a slip st to 1st sc.  (24 sc)


Round 5: Ch 1, *sc in next 3 sc, 2 sc in next sc.  Repeat from * 5 times.  Join with a slip st to 1st sc. (30 sc)


Round 6: Ch 1, *sc in next 4 sc, 2 sc in next sc.  Repeat from * 5 times.  Join with a slip st to 1st sc.  (36 sc)


Round 7: Ch 1, *sc in next 5 sc, 2 sc in next sc.  Repeat from * 5 times.  Join with a slip st to 1st sc.  (42 sc)


Round 8: Ch 1, *sc in next 6 sc, 2 sc in next sc.  Repeat from * 5 times.  Join with a slip st to 1st sc.  (48 sc)


** If you are using ecru in the bun, like I did to lighten the edge of the bun, alternate colors each stitch in round 9**
Round 9: Ch 1, *sc in next 7 sc, 2 sc in next sc. 2 sc in next sc.  Repeat from * 5 times.  Join with a slip st to 1st sc.  (54 sc)


Body (Toppings and Meat)
If you want sesame seeds,  cut a long piece of blanc, and add some now.  I just scatter them, across the top of the bun randomly.  I weave them in with the crochet hook, but you may want to do it with a yarn needle.
  
Remember the top bun will have one or two more rows, the bottom bun will one row in this section
**If you are using ecru round 10 is in ecru, if not round 10 is still in color 842


Round  10: Ch 1, sc in each sc around. Join with a slip st to 1st sc. (54 sc)


Here is where you can have fun and put the topping in the order you like.  
I will be putting them in the order you see in the first photo


Lettuce Round 1: Change to color 3364  Ch 1, Sc in back loops of each sc around.  Join with a slip st in back loop of 1st sc.  


**Come back and do Lettuce Round 2 after  completing the main rounds of your next topping.  Leave the color 3364 attached to work and leave in front of your work to complete Lettuce round two after you finish the next few rows.


Lettuce Round 2:  Pick up a loop and ch 1 through the front loop of the first sc of Lettuce round  1,  * Ch 3, skip next sc, sc in front loop of next sc.  Repeat from * around.  Join with a slip st to first sc.  Finish off, cut off leaving a few inches of string, and pull the string through work into the inside of the burger.


Tomato Round 1: Change to color  321 ch 1, sc in back loop of each sc around. Join with a slip st in back loop of 1st sc.


Tomato Round 2: sc in back loop of each sc around. Join with a slip st in back loop of 1st sc.


Onion Round 1: Change to Blanc ch 1, sc in back loop of each sc around. Join with a slip st in back loop of 1st sc.


**Do onion round 2 after crocheting the topping**


Onion Round 2:  Pick up a loop with color 209 under front loop of 1st stitch on Onion Round 1, ch 1, Slip st in front loop of each sc around.  Join with a slip st to 1st slip st.  Finish off, cut blanc and  209 leaving a few inches of string as a tail, and pull them through, to the inside of the burger.


Cheese Round 1: add color 742 with a chain, sc in back loop of each sc around. Join with a slip st in back loop of 1st sc.


**Do all rows of meat, then come back to Cheese Round 2.  Leave color 742 at the front of work to access then**


Cheese Round 2: Pull up a loop with 742 in front loop of 1st sc in cheese round 1, ch 1, *slip st in front loop of next 11 sc, sc in front loop of  next sc, hdc, dc, hdc in front loop of next sc, sc in front loop of next sc, slip st in front loop of next 12 sc, sc in front loop of  next sc, hdc, dc, hdc in front loop of next sc, sc in front loop of next sc. Repeat from * once. Join with a slip stitch to first slip st.  Finish off, leave a few inch tail and pull it through to the inside of the burger.


If you are using both colors of embroidery thread for the meat just alternate colors each stitch back and forth, then off set them in the additional rows like a checker board.
Meat Round 1: Change to color 938 ch 1, sc in back loop of each sc around. Join with a slip st in back loop of 1st sc.


Meat Round 2:ch 1, sc in each sc around. Join with a slip stitch to 1st sc.


Meat Round 3:ch 1, sc in each sc around. Join with a slip stitch to 1st sc.


Bottom Bun Round 1: change to Ecru (842 if you didn’t use ecru) ch 1, ch 1, sc in each sc around. Join with a slip stitch to 1st sc.  (54 sc)


Decreasing round 1: Change to color 842 Ch 1, *sc in next 7 sc, sc dec across next 2 sc. Repeat from * 5 times.  Join with a slip st to 1st sc. (48 sc)


Round 2:  Ch 1, *sc in next 6 sc, sc dec across next 2 sc. Repeat from * 5 times.  Join with a slip st to 1st sc. (42  sc)


Round 3:   Ch 1, *sc in next 5 sc, sc dec across next 2 sc. Repeat from * 5 times.  Join with a slip st to 1st sc. (36 sc)


Round 4:   Ch 1, *sc in next 4 sc, sc dec across next 2 sc. Repeat from * 5 times.  Join with a slip st to 1st sc. (30 sc)


Round 5:   Ch 1, *sc in next 3 sc, sc dec across next 2 sc. Repeat from * 5 times.  Join with a slip st to 1st sc. (24 sc)


Round 6:  Ch 1, *sc in next 2 sc, sc dec across next 2 sc. Repeat from * 5 times.  Join with a slip st to 1st sc. (18 sc)


Add the pellets now mostly full but with some give.


Round 7:   Ch 1, *sc in next 1 sc, sc dec across next 2 sc. Repeat from * 5 times.  Join with a slip st to 1st sc. (12 sc)


Round 8:  Ch 1. SC Dec across next 2 sc around.  (6 sc dec)


From here I work  a couple more sc dec, then I finish off, pulling tightly.  I pull the thread completely through the center, and trim thread.
DSC09801 (1).JPG


Sunday, September 6, 2015

Labor Day Weekend Project

Here is a little fun project in honor of Labor Day!  

I just finished filming, and am editing now.

Once I have finished editing,  I will upload the video :)

Heather  

Sunday, August 30, 2015

Polymer Clay Chocolate Cupcake Tutorial

Chocolate Cupcake With Loops
Created by: Heather Wells of Sweet & Savory Trinkets


Materials
1 - 2 oz Package of White Premo
1 - 2 oz Package of Burnt Umber Premo
1 - 2 oz Package of Translucent Premo
1 - 2 oz Package of Suede Brown Sculpey III
1 - Pasta Roller or Clay Roller
1 - Straight Clay Blade
1 - ½ Inch  Round Kemper Pattern Cutter (or Round ½” cookie cutter)
1 - Safety Pin or Sewing Pin
1 - Sculpey Gloss Glaze (optional)
A Couple Sheets of Plain White Paper
A Baking Sheet
For cupcakes with a bite Taken out
1 -  Heart Shaped Kemper Pattern Cutter
1 - Bottle of Translucent Liquid Sculpey (TLS)
1 - Small Paint Brush


Directions:
Step 1: Condition a small amount of white clay, roll out a snake 2mm thick .  Lay the snake out straight as possible on your baking sheet (on a sheet of the white paper).  Bake it according to manufacturers instructions and let it cool.
Step 2:  Cut an inch and a half length portion from the snake.  Put it aside for now.
Chocolate Cake mix:
Step 1:  Mix ⅓ of a rectangle of the burnt umber, and  ⅔ of a rectangle Translucent until thoroughly combined, and conditioned.


Step 2:  Make a ball of the chocolate cake mix clay 14mm across.
Step 3:  Start rolling the ball with your fingers into a cupcake shape with a flat top.  The easiest way to do this is by holding the ball between the index finger and thumb of your left hand in a vertical position, and twisting the ball with the index finger and thumb of your right hand.  Your right thumb is closest to you moving the ball towards the left, and the index finger of your right hand is moving towards the right.  Think of how you move your fingers in the “give me money” gesture.  It is pretty much the same.
This forms the cylindrical shape  while keeping the top and bottom flattened.  
Step 4:  Roll the cupcake shape a few times at the bottom of the cupcake to make it a little smaller on the bottom.  
Step 5:  Place the cupcake bottom side down on a sheet of plain white paper.  Press down ever so slightly on the top of the cupcake to finish shaping the cupcake.  Put the cup it aside, and let them rest.
Chocolate Icing Mix:  
Step 1:  Mix ¼ of a rectangle Hazelnut Sculpey III, and ¼ of a rectangle Burnt Umber Premo.  Roll it out flat with your clay roller, or pasta roller to about 1mm thick.
Step 2: Using the ½” round cutter, cut out a circle and center it on top of the cupcake and smooth the edges in a downward motion smoothing it onto the cupcake. Set the cupcake aside to rest.
White Icing:
Step 1:  Condition some white clay, and roll it into a log 1 ½ mm thick.  
Step 2:  Using the small white snake cut earlier, find the center of the top of the cupcake and press slightly to leave a slight indent.  
Step 3:  Make a small indent of the left and right side of the center ident on the cupcake.  Try to center them as much as you can between the center indent and edge of the cupcake.  You will use these indents to help you place the loops.
Step 4:  Cut a length of your newly conditioned 1½ mm snake about 2 ½ inches long.    Place your cured log upright in the first indent on the right.
I am using a rainbow colored one, so you can differentiate between the cured snake, and the loop snake.
Step 5:  Smooth the end of the 2½”  snake onto the edge of your cupcake right above the upright cured snake.  Very gently wrap the snake counter clockwise around the upright cured snake.  Press the wrapped snake very gently down onto the cupcake, and twist the upright cured snake gently while pulling it up and away from the cupcake.
Step 6:  Place the cured snake upright into the the center indent.  Wrap the conditioned snake around the upright snake counter clockwise gently.  Push down on the edges of the new loop ever so slightly, then twist the cured snake gently while removing it from the cupcake.
Step 7:  Place the cured snake upright in the indent on the far left,  and repeat the last wrap like the first two loops.  Gently remove the cured snake.  Press very gently on the top of the cup cake just to help the white loop stick to the top of the cupcake.  Cut the excess clay away from the edge of the cupcake.
Texturing the Cupcake:
Step 1:  Let your cupcake rest two hours, if you end up with a squashed cupcake..  it is because it didn’t rest enough.   If your clay is really soft you may want to wait several hours.
Step 2:  Using your safety pin make tiny circles in the clay of the bottom of the cupcake to make the cake texture.  This part will get slightly squashed on the bottom as it sits and bakes, but it looks more realistic this way any way.
Step 3:  Holding your cupcake very gently, Make tiny circles in the sides of the cupcake.  You are doing it right if tiny bits of clay resembling crumbs are coming off the cupcake onto the tip of your safety pin.  As you rotate the cupcake to texture it all the way around, the parts you textured already may get slightly compressed, this adds to the realism.  If you look at the side of a cupcake it isn’t as airy as the center.   If the sides get more compressed than you like, you can retexture as it while it is sitting on a sheet of paper.  ** To see my hand position while holding the cupcake for texturing see the trouble shooting note at the end of the tutorial.
If you are making a full cupcake, you are finished.  Bake it according to manufacturer instructions.
With a Bite Removed
Step 1:   Using the pointy end of your heart shaped pattern cutter, place the cutter over the cupcake edge slightly and push down.  Remove the cutter from the cupcake.  This is the bitten area.
Step 2:  Texture the bitten area of the cupcake the same way you textured the sides.  
Step 3:  Pour a tiny bit of TLS on some white paper.  Add small pinches of your leftover white conditioned clay to the TLS.  Here are some good photos using pink clay so you can see the process more clearly.
Step 4: Smash the white clay into the TLS with the back of your paint brush.  
Step 5:  Once you have pretty much pulvarized the white clay, stir the mixture together, with the end of back end of your paintbrush until all the lumps are gone.
Step 6:  Dip the end of your safety pin point into the white filling and remove a small amount.  Dab it onto the bitten area of your cupcake.  You are finished now just bake it according to manufacturers instructions.
Once the cupcake has cooled, paint the filling and top with the sculpey glaze if you want them to look glossy.
Troubleshooting:
If your cupcake was squashed from the texturing, the clay was still a little too soft.  There is a fine balance between being a little too soft, to becoming unconditioned.  You can roll the bottom portion between your fingers to enlongate the cupcake before texturing the cupcake like the photo below.
The easiest place to hold the cupcake while texturing is the top and bottom of the cupcake like shown below, and making the tiny circles with your other hand.
I hold the top with my index and middle fingers, so I can leave a gap where the loops are, avoiding smashing the loops.   You can also control the texturing a bit better this way reducing the amount of squashing that reduces the cupcakes height.
**** Texturing takes practice, and each time you do it, it will look a little better than the time before.  You can also practice this technique by using some scrap clay that has been conditioned to practice on, and you can even bake it as an example to keep for future reference.
I actually do this with a little conditioned clay every time I make cakes, just to  see the cured results, to see if the cake color is right, once baked.